Sunday, April 21, 2013

DIY Party: Wall Decor

I have always been obsessed with fun backgrounds for photos.  It's always fun to be able to take pictures at parties and have something pretty or exciting behind you instead of someone's backyard, right?  Enjoy the compilation I've put together and please share some of your own ideas, I'd love to hear them!

Wee Birdy has a very cute and very simple (READ: easy) idea with this giant wall confetti!

Now, this picture from Oh Joy! didn't seem to have any instructions with it, but I love this idea!  If you take streamers or ribbons or whatever you would like for the background and sandwich the tops of the strands between two pieces of tape, you would easily be able to hang it on a wall or between two posts.
Oh Happy Day had a cute idea for a circle photo booth backdrop, which is absolutely adorable.  However, to make it a little less complicated, you could swap out the sewing machine and just tape the insides of the circles to the thread.

For holiday times, I love string lights as a backdrop in pictures.  Instructables has a neat How To to make the lights diffused and less glaring by covering the little bulbs with ping pong balls!

Speaking of string lights, I have been absolutely in love with this idea since I first saw it on Pinterest.  I have a sincere love for canvas, which is how we plan to decorate most of the rooms in our home once everything gets settled.  Apartment Therapy combines those two things (lights and canvas) with some stickers and spray paint and showcased some absolutely lovely wall art.  I can just imagine the huge ones as cute summer night backdrops or, if you use snowflakes, Christmas party/card backgrounds!

I hope you liked some of these!  Please let me know what you think in the comments below and share your ideas!

Tuesday, April 16, 2013

DIY Party: Games

Hello again!  Welcome to part two of five of the DIY Party series!  Today's topic is DIY party games.  I have found two that I really love (however they're both drinking games, so no kids allowed!)

1)  Battleshots

The Pinterest link took me to this site, which is all in Polish.  However, the concept of the game is pretty self explanatory, especially if you've ever played the ever-popular Battleship.

These two took pizza boxes and drew two grids, one on the inside of the top and one on the inside of the bottom.  You place your shot glasses into the grid as you would with your three ships in the original game (one - two spaces ship, one - three spaces ship, and one - four spaces ship).  The other person does the same with their board and then you take turns guessing where the other's ships may be.  If they call a spot with a shot glass on it, take the shot.

2) Shot Roulette

Here we have another game of shots, but this one is a little more dangerous.  Everyone who takes a turn takes a shot, the problem is you may not know what it is until after you have it in your mouth.

If you have any suggestions for more DIY Party ideas or games, please tell us about them in the comments below!

DIY Party: Centerpiece Ideas

Hey everyone!  Welcome to the first installment of the DIY Party series!  This is going to be five sections of DIY party ideas that I have found (and love!) through Pinterest and I cannot wait to start using them!

First off, I found possibly the cutest way to recycle cans from tomatoes or canned fruits.
All you have to do is clean out the can, cover with funky duct tape (which come in a thousand patterns and colors now) and add a ribbon.  So cute and simple, I can't believe I hadn't though of it before now.

Next, from Smart School House, I found this adorable and incredibly easy way to have flower lights be a part of the table without the real-life flames and fire hazard.

Here, I found a great fall centerpiece. Yes, I've already got my mind on fall, but when don't I?  I absolutely love this idea and I tried it last year with my preschool class but my hair dryer is cheap and didn't get hot enough so I'm determined to try again (and succeed) this year.


Finally, I saw this really cute idea on Pinterest, but the source was just the picture itself.  The idea is to have a styrofoam ball and a large candle holder.  Candle holders generally have a spike that goes through the bottom of the candle, which you will need to poke through the bottom of the styrofoam ball.  Then, poke the sticks of as many lollipops as you can fit into the styrofoam to make this cute little "Sucker Ball".

Thanks for stopping by!  Next DIY is party games!

Tuesday, April 9, 2013

The Easiest Picture Display

Hey everyone!  The next few weeks will be posts about things I plan to do when/after I move in with Miss K.  Since I will be moving in two weeks (and have been packing everything) I can't really pull things out and do the project itself, so I'll be showing you the ideas and sharing my own and I will do a follow-up post after they're finished.  Sound good? Good. It better.

The majority of these ideas came from Pinterest (because I'm an uncontrollable addict).  The first one I'm really excited to try is this photo display idea, which I've also seen in the background of ARose186's (Arden) videos on youtube (which can be found here!)

I can't wait to try this out!  If you've tried it, post a picture and show us what you came up with!

Monday, April 8, 2013

DIY Hooded Vest Part 1


Hey everyone! Today is going to be the first installment of a two part project I started a couple of weeks ago. Unfortunately, I haven't had a lot of time to put into the project just yet, but hopefully I'll be able to finish it within the next few weeks.

So, every year in May there is a Zombie March in Boston, MA that I absolutely love. The past few years that I've attended, I've been dressed as a zombie with the people that I go with but this year, one of my friends and I decided that we wanted to go as survivors instead of zombies and have been piecing together costumes together bit by bit.

My friend had bought an awesome cowl hood (which can be found here) and vest (here) from Etsy.

Unfortunately, not all of us can afford to spend that kind of money on super awesome costumes and just have to try to do it ourselves, so here's the beginning of my step by step process to make a hooded vest from an old pull over hoodie!

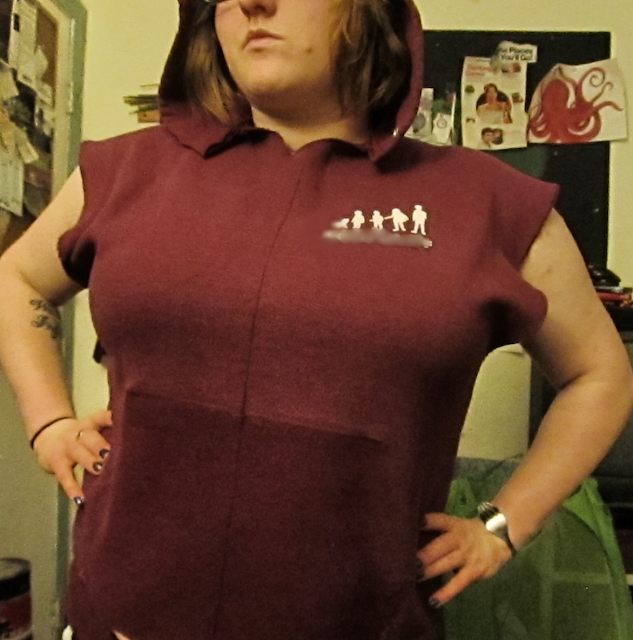
Step One – Rip off the sleeves. I plan to hem these again so that they aren't so wide and don't have that 80's padded-shoulder look to them anymore later on. Also, I ripped the front pocket off and the bottom elastic.
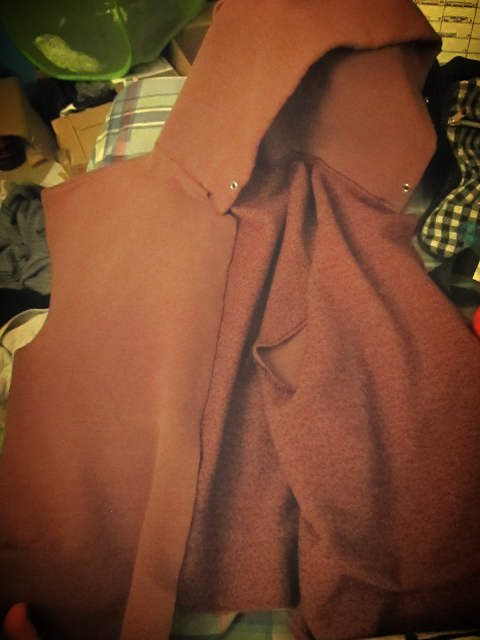
Step Two – Lay flat and find the center. Once the hoodie is flattened, measure from one side to the other side, divide by two and mark the center. I made three marks: one by the neckline, one in the middle of the belly-area, and another at the bottom. Connect the marks with a ruler and draw a straight line all the way down the front. Then, here's the scary part, cut down the center line.
After ripping off the sleeves and drawing the line.


Step Three – (Optional) I tried a few ways to try to get the design off of the hoodie, but none of them really worked very well. I tried the nail polish remover trick, which got a small part of the design to come up, but not enough to actually make it go away. I then tried to scrap it off (while it was soft) with a pocket knife. In the end, I just decided that I would cover up the entire design with a patch of some sort after dying the fabric.

Step Four – (Also optional) My hoodie was a deep maroon color, so I decided to try to bleach out a bit of the color before dying it black. I don't want the black to be the blackest black (since I'm trying to look post-apocalyptic and worn) so I thought this step might lighten it up in the end. Conversely, it could make the fabric soak up more dye and make it darker in the end, but I suppose we'll see when I get to it.
After being bleached to hell three times.. still pinkish.

Step Five – Line the inside of the hoodie. I hate the pill-y look hoodies get after being worn for a while and since the fabric folds over a bit where the two sides meet in the front, I decided I would cover it up. I took an old t-shirt and repeated Step One and Two, then pinned it inside the hoodie as the lining.

Unfortunately, this is all I've been able to accomplish so far, but stay tuned for Part Two!

Tuesday, April 2, 2013

Home Made Coffee Syrups!

Hey everyone!  This project was probably the easiest thing in the world if you can use a stove top.  AND, it's less than the cost of two medium coffees from Dunkin Donuts.  It's a win-win situation.

Ingredients/Tools You Need:

  • Small Sauce Pan
  • 2 Cups Sugar
  • 2 Cups Water
That recipe is for plain liquid sugar for coffee is you're like me and HATE granulated sugar at the bottom of the cup.  As for flavors, you could add in:
  • 1/2 of a cup of caramel syrup 
  • 1/2 tsp. of vanilla extract (preferably clear, but I used the cheap stuff from Stop & Shop) 


Or, if you would like to experiment further, you could add in half of a cup of any berries/fruits to infuse the flavor into the syrups.  I suggest mashing the fruits/berries before adding them to the liquid and strain out any of the seeds and remnants before pouring the syrups into the bottles.  
(Apologies for the crummy phone picture.)

Personally, I didn't want to spend a fortune on fancy bottles (although they are very nice to look at) and I bought them at this Etsy shop.  I gave them as a gift, so I dressed them up a little.  

If you test these out, please leave a comment and let me know how it worked out for you!